If you’re eager to start your cider-making journey, you’ve come to the right place to find supplies! Below, we detail the must-have equipment for crafting a 5-gallon batch of cider. The only ingredient you’ll need to secure locally is fresh-pressed apple juice.
Download a handy dandy check list of cider equipment for making your own cider! Leave it on the kitchen table as a hint, hint for your birthday or holiday gifts!
The Essentials of Cider Making: Equipment Guide for a 5-Gallon Batch
- Listen to Episode: 236 How to Make Cider at Home and peruse the Cider Chat podcast archives for more tips!
- Find Cider Books on maker techniques to orchard care!
“Cider Chat is a participant in the Amazon Associates Program. By clicking on product links below, you support Cider Chat as we may earn a commission from Amazon.com, at no extra cost to you.”
Sourcing Juice and Yeast
1. Fresh Pressed Apple Juice: The Heart of Cider Making
At the core of every delicious cider is the essence of the apple, captured in its purest form as fresh pressed apple juice. This ingredient determines the foundational flavor, aroma, and character of your cider:
- Local Orchards: Sourcing apple juice from local orchards not only supports local businesses but often provides a fresher and more flavorful base for your cider. Different apple varieties contribute distinct tastes and complexities.
- DIY Pressing: For those with access to apple trees or bulk apples, using a cider press to extract your juice gives you full control over the blend of apple varieties and ensures peak freshness.
Always ensure the apple juice is free from preservatives, as these can hinder the fermentation process. The quality and character of your apple juice will shine through in the final cider, so choose wisely!
Yeast in Cider Making
The choice of yeast can significantly influence the taste, aroma, and overall profile of your cider. Generally, cider makers have two primary options:
- Cultured Yeast: These are commercially produced yeasts designed for fermenting cider. They offer a predictable and consistent fermentation process, leading to a more controlled outcome in the cider’s flavor and characteristics.
- Wild Yeast: Found naturally on the skins of apples and in the environment, wild yeast can lead to unique and varied flavor profiles in your cider. Using wild yeast is more unpredictable, but it can yield exciting and distinctive results, bringing a touch of the ‘terroir’ of your location to the cider.
Your yeast choice will depend on your desired outcome and your appetite for experimentation. Some cider makers even blend the results from both types to achieve a specific taste!
Back to top of page
Cider Chat operates on a listener and reader-supported model. These links below will direct you to Amazon and are affiliate links, meaning we may earn a commission at no extra cost to you. Your support through these links helps us continue delivering quality content. Thank you for your patronage!
1. Primary Fermentation Vessel
- Purpose: This is where the magic starts! This vessel houses the apple juice as it undergoes fermentation.
- Recommended: A 5-6 gallon glass carboy.
- Notes: Leave a bit of head space (don’t fill to the top with juice) because during primary fermentation you need to take into account for foaming and sediment. Leave out about 1 liter of juice and freeze that juice to save for topping off later, after primary fermentation is done.

2. Airlock and Stopper
- Purpose: Allows carbon dioxide to escape during fermentation while preventing air and contaminants from entering.
- Recommended: A three-piece or S-shaped airlock fitted into a rubber stopper

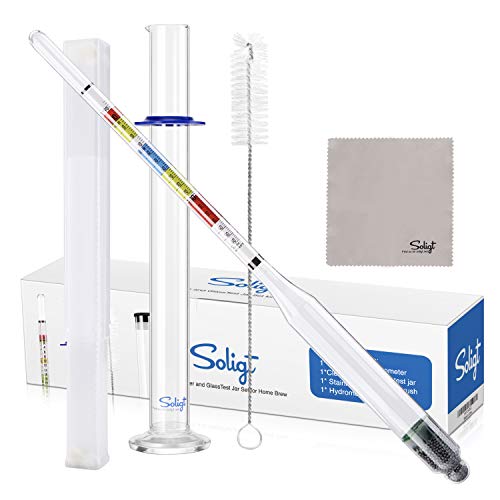
3. Hydrometer
- Purpose: Measures the specific gravity of your juice. This helps determine the sugar content and gives insights on fermentation progress and potential alcohol content.
- Recommended: A cider or beer hydrometer.
4. Auto-Siphon and Tubing
- Purpose: Helps transfer cider between containers without disturbing the sediment.
- Recommended: A plastic or stainless steel auto-siphon paired with food-grade tubing

5. Secondary Fermentation Vessel
- Purpose: Refines the clarity and flavor of your cider after the initial fermentation.
- Recommended: Another 5-6 gallon carboy or bucket.
6. Bottles and Cappers
- Purpose: For storing, aging, and serving your finished cider.
- Recommended: 12 oz or 22 oz glass bottles, and a bottle capper for sealing. For a sparkling cider, consider adding priming sugar before bottling.

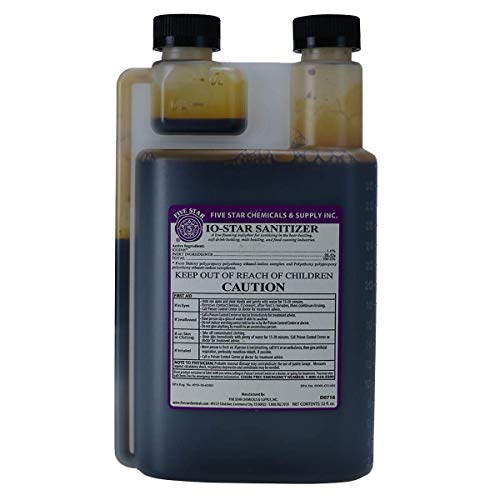
7. Cleaning and Sanitizing Supplies
- Purpose: Ensures that all your equipment is free from unwanted microbes that can spoil your cider.
- Recommended: A no-rinse sanitizer like Star San, and brushes or cloths suitable for cleaning your equipment. Ria has used Iodophor throughout her cider making career. Just make sure you do a good clean rinse. Star San is more widely used these days, but is more expensive.
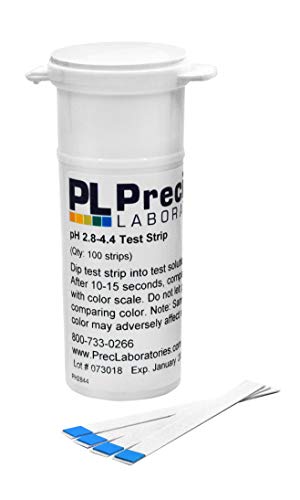
8. pH Meter or Test Strips (Optional)
- Purpose: Measures the acidity of your cider, which can influence taste and fermentation.
- Recommended: A digital pH meter or pH test strips suitable for beverages.
9. Campden Tablets (Optional, but highly recommended)
- Purpose: Helps in preventing oxidation and eliminates wild yeasts or bacteria.
- Recommended: Sodium or potassium metabisulfite in tablet form
By securing the above equipment and sourcing your fresh-pressed apple juice locally, you’ll be well on your way to crafting a delightful 5-gallon batch of cider. Cheers to your cider-making adventures!
Bottling Equipment for Cider Making: Essential Tools for the Perfect Batch
Once your cider has undergone the fermentation process, the next vital step is bottling. Bottling not only helps in storing and aging but also adds the final touches to your cider, such as carbonation for a sparkling cider. Here’s a breakdown of the essential bottling equipment for cider-making enthusiasts:
1. Bottles
- Purpose: The primary vessel for storing, aging, and serving your cider.
- Recommendation: Glass bottles come in sizes of 12 oz or 22 oz (26 mm diameter crown cap needed) and 750ml (takes 29 mm crown cap). The amber colored glass helps in protecting the cider from light, which can degrade its quality, so it is consider preferable, but really any color will work as long as it is clean.
- Notes: Ask family and friends to save beer bottles that you will later wash and clear off labels is a great way to recycle. (They might even clean the labels for you in exchange for a bottle of cider!)
2. Crown Caps
- Purpose: To create a tight seal, ensuring freshness and aiding in the carbonation process.
- Recommendation: Standard 26mm crown caps for 12 oz or 22 oz bottles – 750ml (takes 29 mm crown cap). They come in various colors and designs, which can be fun if you want to personalize your cider batches.

3. Bottle Tree
- Purpose: Once you’ve washed and sanitized your bottles, you’ll need a place to let them drain and dry without risking contamination.
- Recommendation: A bottle tree is a simple, vertical, tree-like structure that lets you hang bottles upside down. This ensures they dry completely and remain sanitary.
- Notes: You can get a larger one, but I have found they can get tipsy so be careful.

4. Bottle Rinser
- Purpose: Ensuring your bottles are impeccably clean is fundamental for preserving the taste and quality of your cider. The bottle rinser aids in this by efficiently rinsing bottles to remove any residual cleaning agents or debris before the bottling process.
- Recommendation: Invest in a Vinator-style bottle rinser. This handy device allows you to pump a sanitizing solution up into an inverted bottle. You simply press the bottle’s mouth down onto the rinser, and it sprays the solution, effectively covering the interior. After rinsing, bottles can be placed on a bottle tree to drain and dry. When using a rinser, ensure you use the appropriate sanitizing solution and always follow the manufacturer’s instructions for best results.

5. Capper
- Purpose: To firmly secure caps onto your cider bottles, ensuring an airtight seal.
- Recommendation: There are two main types of cappers: the handheld wing capper and the bench capper. For beginners and smaller batches, the wing capper is generally easier to use and more affordable. However, if you’re planning on making larger quantities or want a more durable option, you might consider investing in a bench capper.
- Notes: This capper linked below can be fitted for both a 26mm & 29 mm crown cap.
5. Bottle Filler (Optional– highly recommended)
- Purpose: Helps in transferring cider from the fermentation vessel to bottles without spilling or introducing oxygen.
- Recommendation: A spring-loaded bottle filler can be attached to your siphon, allowing for easy and precise filling
- Note: This comes with the syphon tubing recommended above. Here is the link again. 🙂
6. Priming Sugar (For Sparkling Cider)
- Purpose: When added before bottling, it ferments and produces carbon dioxide, which carbonates the cider.
- Recommendation: Corn sugar or dextrose are commonly used. The amount varies based on desired carbonation levels.

Remember, bottling is not just a storage step; it’s an essential part of the cider-making process. Proper bottling ensures that your cider retains its flavor, freshness, and can even enhance its taste over time. So, make sure to invest in good-quality bottling equipment to enjoy the best results from your cider-making efforts!
